
Classic Much Forgotten Bartending Techniques
I learned bartending from the old pros who tended bar in the 60’s and 70’s and who in turn learned from bartenders from the 40’s and 50’s. As for just how far back these traditional techniques go, my best professional guess would be to say likely back at least as far as the speakeasy days of prohibition when America became famous for mixed cocktails in the attempt to disguise the alcohol in the drinks from the authorities.
Quality of Garnishes
Hand select only the most perfect lemons, limes, oranges, celery available from the walk in fridge, and inspect your incoming deliveries (or speak to the manager to have him do it) to make sure that what is being purchased is top notch and fresh. Although many bartenders who work only in full liquor/no food bars perceive Drinking and Dining to be completely separate from one another, conceptually the Bartender has the potential to make him or herself into the equivalent of Bar Chef. Good chefs demand fresh ingredients of only the highest quality. Nothing blemished, nothing deformed, nothing that isn’t fresh, and always looking for local produce with the most flavor. Discerning palates notice the difference in quality even if many won’t notice or care – except that what they’re consuming seems pleasantly better than they’re used to elsewhere.
When you’re using quality well, middle shelf and top shelf liquors and taking every precaution to see that your ice is fresh and cold, your bar well wiped down and clean, ashtrays covered during removal and replacement you don’t want your positive efforts to be ruined by brown spotted or dried out garnishes. It may seem like a small thing, but throwing out cut lime wedges that aren’t as fresh as they should be and cleaning out the garnish trays regularly makes a huge difference in quality, appearance, flavor, aroma, and perception when you’re presenting a cocktail properly held by the stem in a pre-chilled glass to your bar guests.
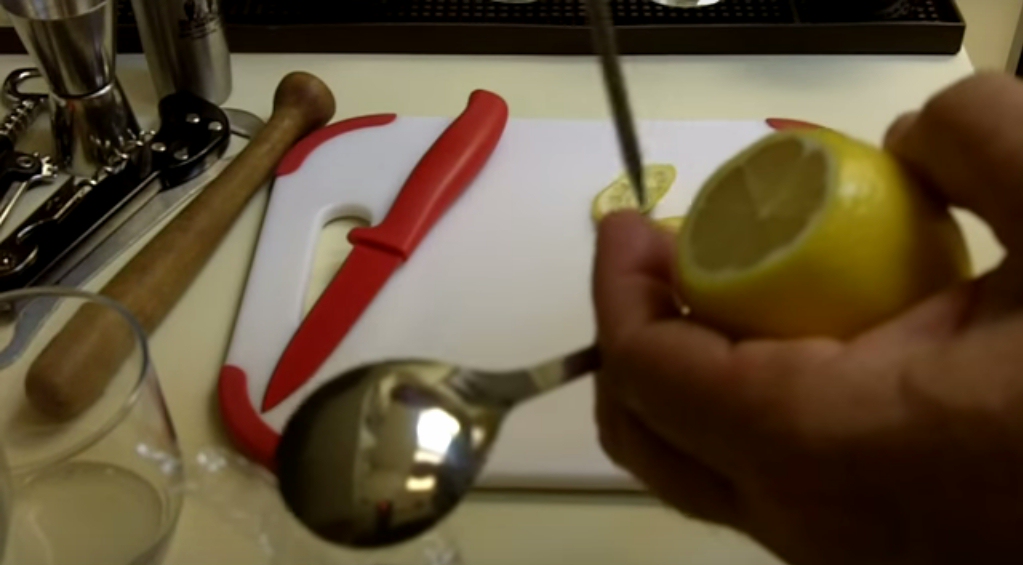
Twist that Twist, Square it Up, and Remove that Pith!
Lemon and lime wedges are easy. Slice the ends off both and then limes in half and quarter them giving you eight wedges. Lemons cut down the center, lay them flat and create six long wedges – all you have to do to make them look good is choose unblemished fruit. But Lemon Twists are an entirely different beast. Most bar backs cut a quarter of a bucket of twists simply by slicing the skin directly from the outside of the lemon. They wind up oval or oblong in shape, paper thin at the edges and thick in the centers, sometimes with a little bit of fruit showing. These aren’t twists; they’re monstrosities, and at the very least they need a quick going over again to square them up and give them right angle corners as well as a quick removal of the thick pith (that white stuff between the fruit and the skin). Most bars have known crowded days, like Friday and Saturday nights, so coming in a little early to personally go over the twists to make sure they’re done right is the way to go, or do a dozen or so each time it slows down a bit.
It’s also a good idea to create some top notch twists for V.I.P.s (friends of the boss etc) to let them know they’re important.
Twists are Twisted!
I’m seeing an awful lot of videos by experts out there where twists are big and wide where the twist is held lengthwise between thumb and forefinger with two hands and squeezed to express the oil onto the surface of the drink. That’s not twisting. That’s squeezing. After they squeeze it then then twist it up into a curl, run it around the rim of the glass, and either drop it in or hang it onto the rim of the glass. That may be fine in low volume slow bars, but why go through the extra step of squeezing and then twisting, when twisting alone will do.
While saving time on a single task may not seem like a big thing, it is. Through small adjustments you can speed up without working harder and do significantly more work in a shorter period of time. In the process you will be able to do that work under less stress, be more relaxed, and earn more tips. Learn more about becoming twice as fast behind the bar by reading my post entitled Becoming Twice As Fast Behind The Bar Requires Thought and Constant Innovation.
Short Shakes and Various Shaker Tin Sizes
While almost every bar universally has the large 32 oz stainless steel shaker tins most bars today don’t have Short Shakes of any kind. Short shakes come in a variety of sizes from about 8 oz to 16 or 17 oz. in size.
These are far better than the large 32 oz shaker because they’re small enough to place on one end of the rubber drink pouring mats, and are very quick and easy to rinse out saving a lot of time. The only thing you’re going to want to make certain of is that you get the short shakes with the largest top diameter possible no matter how short they are, since the top lip of your bar’s glassware (rocks, Collins and highball glasses) will need to be able to fit within the top lip diameter of the short shakes.
Bar Spoons – Upside Down is Right Side Up
You’d have to be blind not to notice that bar spoons look strikingly different from standard tea spoons. They’re longer for one, the spoon itself is more rounded, shallow and paddle shaped. The handle is long and twisted for several inches in the middle, and the “top” has a red plastic tip attached to it for Stirring a Martini or Manhattan the classic way. I’m seeing an awful lot of home grown self taught (or trained by those who were self taught) bartending training videos using the spoon end to stir Martinis. Use the red tip end and save the spoon side for getting olives and cherries out of their respective jars.
Making “The Perfect” Long Island Iced Tea
Every bartender knows the ingredients in a Long Island Iced Tea. (Vodka, Gin, Rum, Tequila, Triple Sec, Sweetened Lemon Juice and some Coca-Cola), but YouTube (once again!) is full of videos teaching the wrong technique for making the drink. In some cases the Coke is poured right on top and served that way, in other cases the video suggests capping it with a shaker and shaking it.
If you’ve ever taken a bottle or can of Coke and shaken it then you know what happens. The bubbles all expand and build up an immense amount of pressure and the soda shoots out everywhere as soon as you open the top. A Long Island Iced Tea isn’t 100% Coca-Cola but when shaken hard (another problem with YouTube bartenders – the “Soft Shake” the “Side Agitation” – no pile driving crushing force involved at all) the gas will escape, break the seal, and you’ll have Long Island Iced Tea all over your white bar jacket, tuxedo shirt, cowboy shirt or whatever your bar says you should be wearing.
Instead the way to go with a Long Island Iced Tea is to build the drink in one Collins glass and then pour it into another empty glass and transfer it back and forth from glass to glass a few times so all the carbonation escapes and it tastes like an iced tea, not an iced tea soda.
What Was Covered in The Video and Text In This Post
- Basic Lemon and Lime Wedges
- Advanced Lemon Twist Making and How to Twist Them
- Introduction to Short Shakes
- How to Properly Use a Bar Spoon
- Making a Long Island Iced Tea the Right Way

Site Author, David Jonathan Curtis: David Jonathan Curtis, a seasoned professional in his fifth decade of bartending and bar management, began his career in Midtown Manhattan, NY, tending and managing bars before diving into Manhattan’s bustling nightlife scene. Over the years, he has mastered high-volume, high-pressure bartending as the lead bartender in both iconic Midtown clubs and Wall Street bars, generating over $1,350,000.00 annually in personal drink sales. He has since extended his expertise to establishments in Georgia and now Tampa, Florida. David’s roles as a Bartending Instructor at the American Bartending School in Tampa, while maintaining a second job bartending, and his years experience of managing bars, and working as a Brand Ambassador along with his extensive professional library of over 1,000 bartending books, highlight his dedication to continually refining his craft. He holds a diploma in Bar Management and is BarSmarts certified by Pernod Ricard.
